Our installation process will depend on the type of vehicle install that is taking place. It could take from a couple of hours to a couple of days dependent on the service and size of the install.
Installation Process:
We will contact you once production is finished and set up a date for you to drop your vehicle off at the storefront in the morning. We will contact you when your vehicle is ready for pick-up.
The duration of your vehicles stay at our storefront depends on:
-
The amount of material that is being used for your service.
-
The weather- Vinyl acts differently in different weather conditions. It is more rigid, prone to breaking, and less prone to stick onto surfaces in cooler temperatures. It is prone to stretching in hotter temperatures.
-
Our schedule- The time of day for application depends on how busy our team members schedules are on that particular day.
*Your vehicle must be clean on day of drop-off. If it is not we will charge a fee*
Vehicle Wrap Installation:
For vehicle wraps we design and produce the products but our third party installer (Alpha Wraps) installs the vinyl. The process of this vinyl will be the same as the others but instead of dropping off the vehicle at our storefront you will drop it off at the Alpha Wraps facility. For other information contact us.
|
*We are not responsible for any chips, dings, or scratches of vehicle exterior*
Decal Installation
1.Cleaning the Area
Before applying decals to a vehicle, make sure the vehicle is clean of all dirt, bugs, tape, etc. Do not use Windex or waxes on the vehicle before having the decals applied. This will cause damage to the decals and can possibly shorten the life of the decals significantly.
2. Positioning the Decal
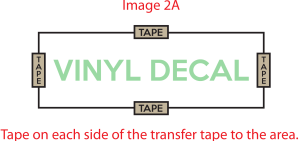
After cleaning the area where the decal is going to be applied add a piece of tape on each side of the transfer tape (Image 2A). Use a tape measure if possible to find the center of the area you are applying. Once you have the decal positioned where you want it, make sure the pieces of tape are sticking to the area.
3. Removing the Backing Paper
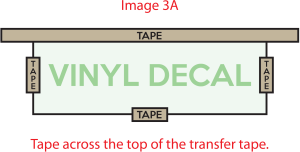
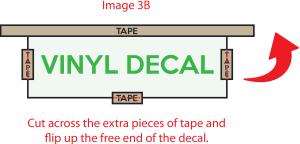
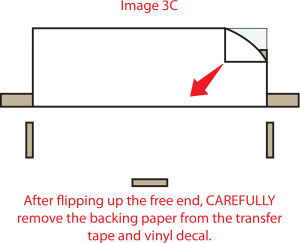
After the decal is positioned correctly, tape all the way across the top of the transfer tape (Image 3A). Then cut the extra tape along the red dotted lines as shown in Image 3B (but not too deep), you can use these pieces of tape to line up your decal begore sticking it in place. Lift the free end of the decal up and carefully remove the backing paper (Image 3C).
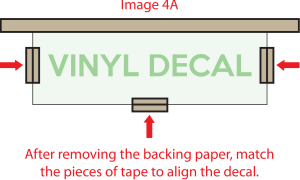
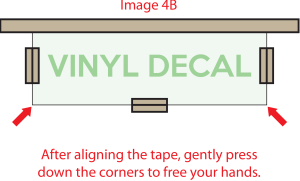
4. Lining Up the Decal
After the backing paper has been removed, slowly lower the decal to match the tape you cut earlier (Image 4A). Do NOT let the decal touch the surface you are applying to yet. After it is lined up gently press down the corners of the transfer tape to free up your hands for applying the decal (Image 4B).
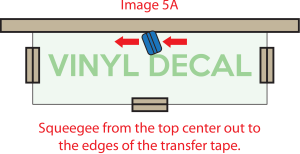
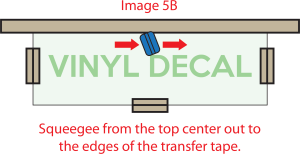
5. Applying the Decal
After the decal is lined up, use a squeegee, credit card, gift card, etc. to apply the decal. Start from the center top, Squeegee left and right all the way to the edge of the decal (Image 5A and 5B). Repeat this step until you have completely squeegeed the decal to your surface.
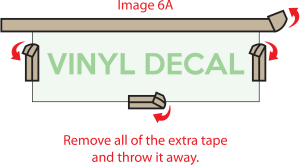
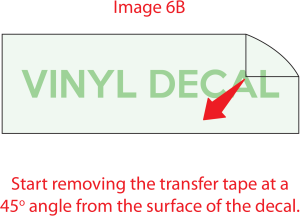
6. Removing the Transfer Tape
After the decal is completely squeegeed firmly to your surface, remove all of the extra tape you added and throw it away (Image 6A). Starting at the top corner of the transfer tape, slowly start to pull back the transfer tape at a 45 degree angle (Image 6B). Do NOT pull the transfer tape straight out from the surface. This can cause the tape to tear the decal or rip off the decal from your surface. If the decal did not stick to your surface, use your squeegee to go over the problem area again.
7. Finishing the Decal
After the transfer tape is off of the surface, make sure the decal is wrinkle free and bubble free. Check to make sure all the edges of the decal are flat and not folded onto itself. If you have bubbles, refer to the below images to help remove them.
Quote
Contact Us